Showing posts with label Crochet. Show all posts

1/1/13

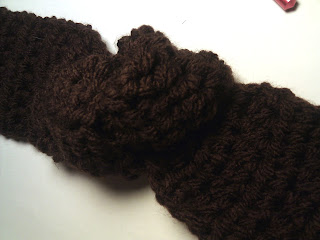
Pattern: Knotted Crochet Headband

What you need:


  • Bulky Yarn
  • Size K crochet hook
  • Tapestry needle

What to do:

Decide how wide you want your headband to be. You can make yours thinner or wider than mine, just add or subtract foundation chains.

Chain 8. 
Row 1: Starting in the 2nd chain from the hook, Half Double Crochet in all 7 stitches. 
Row 2: Chain 1 and turn. HDC in all 7 stitches.
Row 3-Row 20: Repeat Row 2.


Take your flat headband and tie a loose knot in the middle. Test to see how it looks on your head, making sure the knot is not too tight.


Continue to crochet, repeating row 2 until the length of the headband can wrap around your head comfortably.

Connect the opposite ends with a slip stitch or sew closed with a tapestry needle.

Sew in your ends.

12/30/12

a new year is a good time for change

We have a lot of changes going on right now. To give you a quick run down, here is a list of some new things coming up:

New business name!

We have changed business names as we head in a more focused direction. The inspiration came from our dogs [that we love so much] that we think look and act like tiny bears.

[Maci enjoying the sun]

[Maci and Toki on a road trip]

[Toki gets up close and personal]


New team member!

My sister has decided that she would like to join in all the crafting fun and help us grow! I am psyched that she is on board. It's always more fun with company! I'll post more on this later.


New designs!

I have been testing and experimenting and designing like crazy! I've got several new items coming to the shop this month already and I plan to keep on designing new items and stocking up. Also, I will be actually adding PDF patterns to the shop and even some free patterns on here!


More updates coming soon!


8/20/12

New Cowls!

I've recently been loving the idea of making a ton of cowls for my etsy shop. So, I've been playing around trying to come up with some new patterns and came up with a couple of cute things.

I had originally planned to make this a convertible cowl. One that had a drawstring at the top and turned into a hat, but the yarn I used was just way too thick for that. It ended up looking kinda silly as a hat, but I really love it as a cowl. This pattern is really easy, so I definitely will be making it a staple in my shop.


This cowl is really awesome. I think it looks a bit more masculine, so I think I'm going to gift it to my husband instead of selling it. I really, really love this yarn. This was my first time using it and I have fallen in love. I think the little bits of tweed are just gorgeous and really make everything look more interesting.


8/11/12

How I spent my Saturday

After a crazy busy week, I got a little bit of a break and decided to pick up some yarn and spend some quality time crocheting. 


After polishing up my shell skills, I decided to get to work on an infinity scarf that I've been thinking about and doodling for a couple of weeks now. So far, I am really loving the way it looks. I haven't completely decided on the total length or if I'm going to twist it before sewing it together, but I'm just letting it flow today.


8/7/12

Projects in Progress

Here's a little sneak peak at some projects we have been working on.

This is going to be a pair of cotton armwarmers that will lace up, similar to the dance socks I posted about here. I think they will be super cute!


This is a headband/earwarmer made of 80% Peruvian Highland Wool and 20% Donegal Tweed. The yarn is absolutely gorgeous and soft. I love the way it looks with the buttons! The best part is that it will fit any size head, as you can just button it anywhere it feels comfortable for you.

[in progress. i just love the flecks of tweed!]


These items will be available in the shop some time next week.


11/19/11

Working in the back loops

Working in the back loops is a useful tactic when you want to create an item with a little bit of ribbing detail. Not only does this make your work look more interesting but it gives your item a lot of useful stretch and softness.


Where exactly is the back loop?
Once you know where to look, the back loop is super easy to identify and breeze to work in.

Look at the top of your row of crochet. There is a "<" shape at the top of each individual crochet. When you are holding your work as if you are working right to left, the back loop is the farthest leg of the loop from your body.


How to work it:
Working into the back loop is super easy. Insert your hook into the "<" shape, through the middle [in between each leg]. Push your hook under the back loop and work your crochet from there!


If you are working your crochets in the back loops, you will start to notice a subtle ribbing of your item. 


It's that simple!

If you have any questions, feel free to email me & ask!


10/4/11

FREE Yoda LOOKALIKE Ear Pattern!

Please Note:
This is my own personal pattern that I created. Please do not copy, manipulate or sell my pattern. Feel free to sell your item after creating it. Do not post this pattern to any other site - Please give credit to me when sharing this pattern.

>>>>>>>>>>>>>>>>>>>>>>>>>>>>>>


What you will need:
Crochet hook size h/8 or 5.00 MM
Crochet hook size G/6 or 4.25 MM
4 Ply Worsted weight yarn


Familiarity of all basic crochet stitches listed below.

Terms Used:
CH: Chain
ST: Stitch
SS: Slip Stitch
SC: Single Crochet
HDC: Half Double Crochet
DC: Double Crochet
TC: Triple (Treble) Crochet

Instructions:

Start using your size H crochet hook.
Chain 8
HDC in the next 6 ST

ALL IN 7th ST, HDC x4
(turn work to prepare to crochet down opposite side)


1 HDC in between each stitch for next 7 ST.


CH 1
Turn

1 HDC in each ST (in between/under loops for entire pattern for stiffness) for 6 ST.


Work 2 HDC in each of the next 4 ST (8 Total)

Work 1 HDC in each ST for remaining 7 ST.


CH1
Turn

1 HDC for 7 ST

2 HDC in each ST in the next 3 ST


ALL IN THE NEXT STITCH:
1 DC, 2 TC, 1 DC


2 HDC in each ST in the next 3 ST

1 HDC in each ST for the next 7 ST


CH1
Turn
HDC all the way around the ear (30 ST total)


CH1
Turn
Change crochet hook to size G or 4.25 mm.

SC in each stitch for the next 15 ST.

2 SC in next stitch

1 SC in each stitch for the remaining 14 ST

CH1
Turn
this round will cause the edge of the ear to begin to roll up. This is a good thing.
1 SC in each stitch for 14 ST


ALL IN THE NEXT STITCH:
1 HDC, 1 DC, 1 HDC


1 SC in the last 16 ST


CH 1
Turn to where the point of the ear is pointing down and the flat side is up towards you.


Work 1 HDC in between each row of previous crochets, about 10 ST. (It doesn't have to be too exact, because we are only using these crochets to draw the ear in a bit.)


At the end of the row, CH 1, and connect to your beginning row with a SS.


Ch1 to secure. Leave a long tail for sewing to hat. cut string, and pull loop out to secure ear closed and form your tail.

If you have any frayed edges, sew them in before we crunch up the ear.

Thread tail into your tapestry needle.
Weave needle in between each of the 10 HDC's you made in the bottom row.

Pull yarn through -- Pull tight to achieve desired gathering of the ear.

Knot to secure. Leave tail to sew onto hat.

Repeat to make your 2nd ear.

Attach them in the desired location on your preferred hat style.


Feel free to add more or less stitches into your foundation chain and throughout the pattern to adjust size. This pattern is specifically to be used for a baby sized hat, about 3-6 months.